Wow. I started writing this as an aside to a post I’m writing about my experience with one year of solar energy for my home. Apparently, I had more to say than I realized and this turned into a 1400 word post of its own! This post lists some important energy efficiency tips and should be useful to all homeowners, regardless of whether solar is on your radar or not. If you are in fact considering solar, take the steps noted in this post first! Otherwise, you’ll end up buying a larger (and more expensive) solar system than you actually need.
As you can tell, energy efficiency and renewable energy are really important to me (I even did my PhD research on renewable energy!). If you have any questions, please leave them in the comments below and I’ll try to respond quickly. Also, this is by no means a comprehensive summary of steps you can take to improve your home’s energy efficiency, so if there are any big ones I didn’t touch on that you think are worth mentioning, please point that out in the comment section as well.
Ok, now that the preamble is over with, let’s get on with it. I’ve split my suggestions into three categories: steps every homeowner should take, steps every homeowner should consider taking, and advanced steps you can take if you want to max out your energy-efficiency.
1. Steps every homeowner should take. NOW.
Whether your goal is to save money or to do your part in reducing fossil fuel consumption, solar is NOT the best first step. Before I went solar, I did the following:
- Replace incandescent bulbs with LEDs.
- Weather strip my house and re-caulk all my windows (and I have a lot).
Between these two things alone, I estimate that I reduced my home’s energy usage by about 30%. That’s a lot of money! And a lot of electricity!
Replace all incandescent bulbs with LEDs:
- You can do this yourself.
- Replace ALL the incandescent bulbs on your property – don’t forget the ones in your yard/patio)!
- Don’t wait for incandescents to burn out. REPLACE THEM NOW. I know that personally, I wasn’t comfortable at first disposing of perfectly good, working bulbs. But the thing to remember is that incandescent bulbs aren’t perfectly good! They’re outdated and inefficient. You will save more money by just switching to the LEDs now. They’re that much more energy-efficient and cost-efficient!
- If you have CFLs (those spiral ones), I would say leave those in until they burn out. LEDs aren’t that much more energy-efficient than CFLs. The more important difference is in the lifespan (data here). If you’ve already paid for the CFL, just leave it be. When it comes time to replace it though, go LED.
- Check with your local utility to see if they offer rebates or cash-back on LEDs. When I replaced my bulbs, my utility (TEP) had a deal with both Home Depot and Costco, making the LEDs there really cheap!
Weather stripping/caulking your house:
- You can do this yourself.
- For caulking, all you need is a caulking gun ($10-$20) and some caulk (about $5 per tube – I used about 4 tubes on my house and it will last for years). Just go to your local hardware store and ask one of the staff to help you select the best caulk for your home. Take photos of your house using your phone before you go so they can see the color, material, etc. They can also show you how to use a caulking gun.
- For weather stripping, you first need to figure out if you have any obvious leaks in your home’s exterior openings. For instance, in the winter do you feel cold air flowing in under your front door? Through a closed window? If yes, some simple steps can save you a bunch of money on your electric bill. Again, take some photos and go to your local hardware store. They’ll be able to help you find the right stuff.
2. Steps every homeowner should consider taking.
These steps are more advanced and time- and money-intensive than those listed above. Nevertheless, every homeowner should at least think about these, especially before going solar. You may decide nothing needs to be done, or that it’s not worth doing in your case, and that’s okay. But think about it!
- Replace single-paned windows with double or even triple-paned windows.
All of the windows in my house were already double-paned when I purchased it so I didn’t need to do this. If you have single-paned windows, talk to an expert to get a proposal for new windows and installation and an estimate of the energy savings in your area.
- Re-insulate your roof (and maybe even walls).
My walls are adobe brick (a Tucson specialty!) and already do an excellent job insulating my house. My roof is a flat roof with a layer of foam insulation, a water-proof membrane, and white paint topping it all off. You won’t find this type of roof in most parts of the world, but it’s perfect for Tucson where we don’t need to worry about snow piling up. The white paint reflects as much sunlight as possible, thereby reducing the energy required to cool the house to a tolerable temperature in the summer. There was nothing I needed to do to make my roof more energy-efficient when I moved in. If you have an attic, however, this might be something to think about! Again, talk to an expert in your area.
- Get a duct leakage test.
A duct leakage test measures leakage in your heating and cooling ducts. Many people pay a lot of money just to heat/cool air that, since it’s leaking out of the ducts into the walls, doesn’t even heat or cool their home! Many utility companies and/or local governments will either do this test for free, reimburse you all or part of the test cost, or help cover the costs of any improvements that may be recommended after the test is complete.
3. Steps toward maxing out energy-efficiency in your home.
If you want to go super hardcore with reducing your energy consumption, consider the following:
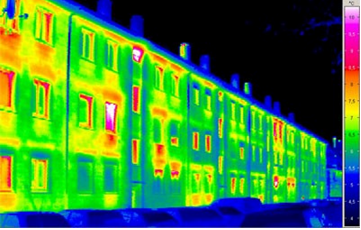
- Thermal imaging assessment
- Blower-door test
Also known as infrared camera or thermographic inspections, thermal imaging assessment helps you visualize where your home is leaking energy. Whether you are losing heat in the winter or cool air in the summer, this assessment can be eye-opening. The infrared camera shows you differences in temperature in the form of color. So, the darker the color on the image, the colder the temperature and vice versa. You can then use these thermal images to see where air is linking. For instance, this type of assessment might help you realize you need more insulation in a specific part of your house, that you need to seal your windows better, or that you’re losing a ton of heat through your chimney. You can either hire someone to perform this assessment for you or go the DIY route and rent a camera. Some local governments even offer this assessment for free (or are willing to reimburse your costs) so be sure to check it out!
A blower door test is used by professional energy auditors to determine how airtight your home is. The auditor mounts the blower (a big fan) in one of your home’s exterior door frames and uses it to blow air out of your home. This reduces the pressure inside, pulling air in through all the leaks in your home’s exterior. The auditor can then detect these leaks. Here’s a video that describes the process:
Summary
Ok, for those of you who are in the TL;DR camp, here’s a quick summary of my energy efficiency tips for your home:
Definitely:
- Replace incandescent bulbs with LEDs. Now.
- Weather strip your house and apply caulk around your windows (as needed). Now.
Consider:
- Replacing single-paned windows with double or even triple-paned windows.
- Re-insulating your roof (and maybe even walls).
- Getting a duct leakage test.
To max out energy efficiency, also:
- Perform a thermal imaging assessment.
- Get a blower-door test.
Thanks for reading! As I said above, if you have questions or additional energy efficiency tips, let us know in the comments below! Also, let me know which steps you decide to take!
If you agree that energy efficiency is important, please consider sharing this post:
Share this Post